Flutter: Using Riverpod for State Management
Oct 12, 2020 - 14 min read
From the creator of Provider, with contributions from other talented Dart/Flutter developers, Riverpod is considered Provider 2.0 amongst the Flutter community. Riverpod can be considered as a rewrite of Provider that solves many of the common issues developers stumbled upon with Provider.
Disclaimer: Riverpod is not officially Provider 2.0, and has just recently left its experimental status. It should be safe to use in production but there may be changes to the API as the package is further developed.
Why is RiverPod better?
Riverpod is “Compile Safe”. What this means is that you will no longer receive errors like ProviderNotFoundException. If the code compiles it works.
Riverpod allows you to only rebuild the UI where needed using the Consumer Widget. Although this was possible with Provider, it is much simpler now and will drastically improve the performance of your Flutter applications.
Riverpod does not depend on Flutter. This means you don’t need BuildContext to listen to a provider. This is handy when trying to listen to a provider on a different route or in a modal/dialog.
Riverpod lets you inspect your state in the devtool. This is huge, and it is said that a full-blown state-inspector is in-progress.
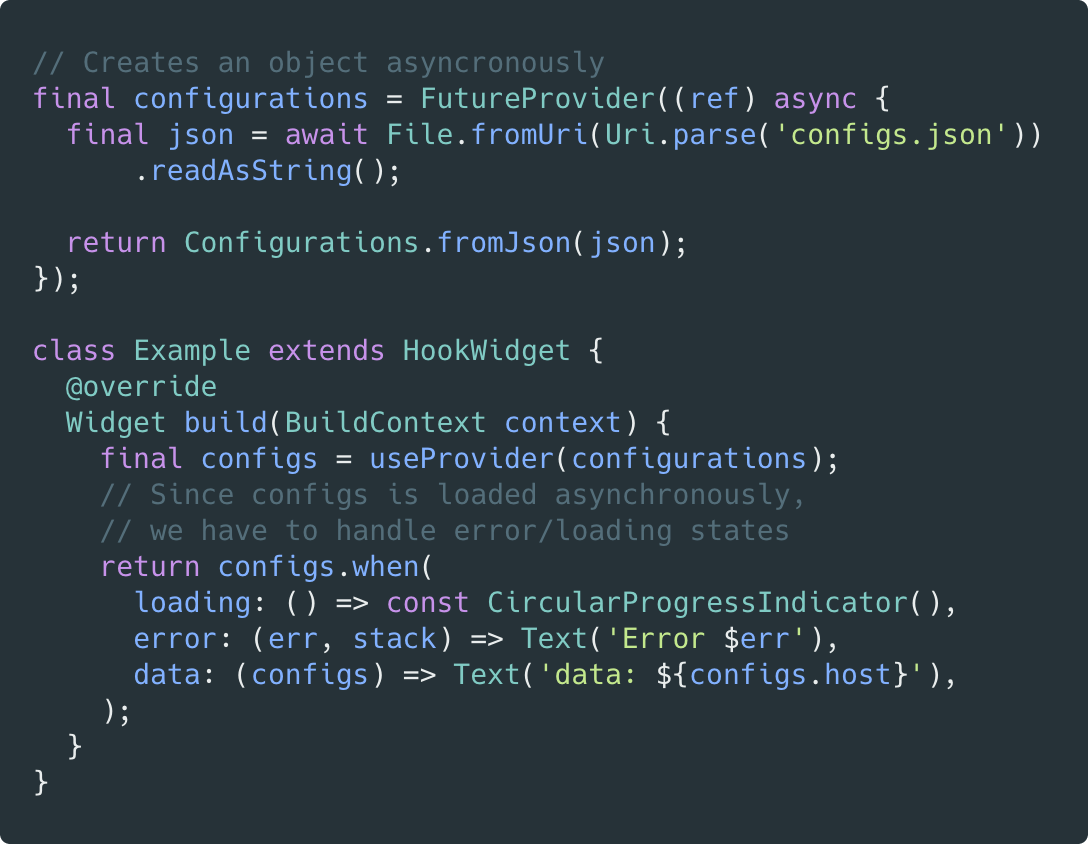
Riverpod makes it easy to safely read providers. We will touch on this later, but here is an image from the official website riverpod.dev showcasing how that works.
Types of Providers
Here is a list of all the providers I will discuss throughout this article. They are all syntactically very similar but serve a different purpose.
Provider
StateProvider
StateNotifierProvider
ChangeNotifierProvider
StreamProvider
FutureProvider
ScopedProvider (I don’t show an example of this one)
Getting Started with Riverpod
When getting started with Riverpod you need to understand whether you are going to be using Dart only (No Flutter), Flutter, or Flutter w/ flutter_hooks. In each of these situations, a different import is required, however, for simplicity, this article will only discuss those building standard Flutter applications.
Install
To install RiverPod, add this to the dependencies of your pubsec.yaml, then run flutter pub get.
flutter_riverpod: <latest_version>Import
Everywhere you intend to use Riverpod you need to import the package with the following line.
import ‘package:flutter_riverpod/flutter_riverpod.dart’;Create Provider Scope
For widgets to be able to read/listen to providers, you need to wrap the entire application in a ProviderScope() widget. This is where the state of our providers will be stored.
void main() {
  runApp(
    ProviderScope(
      child: MyApp(),
    ),
  );
}
Now let’s start managing some state with Riverpod!
Using Riverpod
Let’s go over all the ways you can use Riverpod to manage your state.
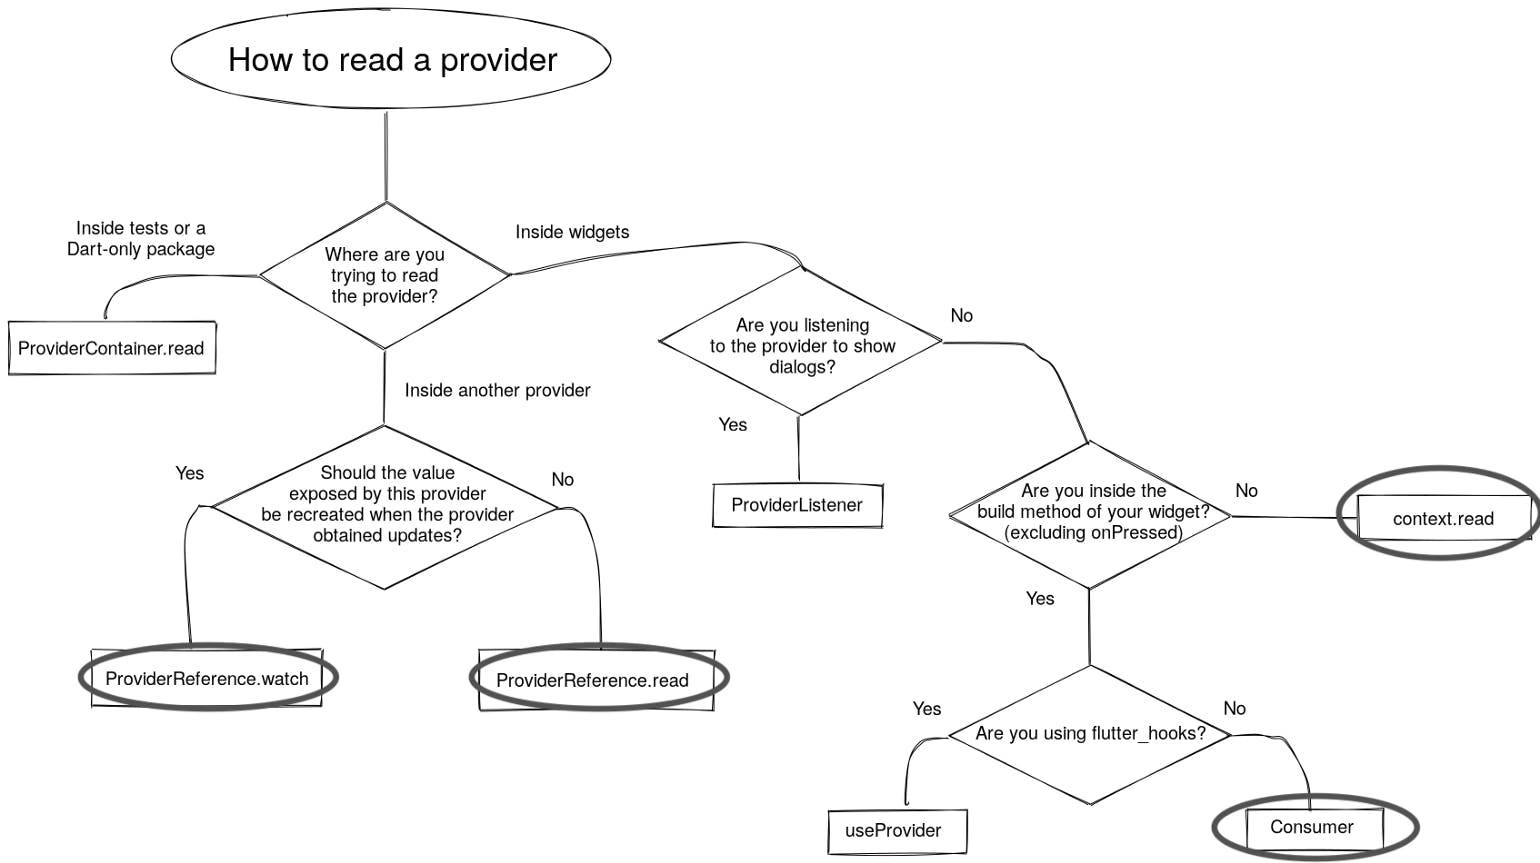
The first thing you need to know is where you intend to read your Provider. Riverpod.dev has a fantastic graphic to help you understand how to read your provider in all situations. I will only be discussing the ones circled in the graphic below, the article would be too long if I delved into all of them.
Let’s start by creating our Providers, then discussing how they can be read.
Provider
To create a standard provider you would do the following. Where ref gives you access to get other providers inside of this provider. I will show you an example of this later on.
final nameProvider = Provider<String>((ref) {
  return "Sparc Agency";
});
There are two ways to read this provider in the Build method. One is creating a Consumer Widget nested in your widget tree, and the other is by using a ConsumerWidget instead of a StatelessWidget. I will discuss this later in the article and tell you when each would be appropriate. However, for each of the examples below, I will be using a Consumer in the widget tree.
Reading this provider in the build method would look something like this:
@override
Widget build(BuildContext context) {
  return Scaffold(
    body: Center(
      child: Consumer(
        builder: (context, watch, child) {
          final String name = watch(nameProvider);
          return Text(name);
        },
      ),
    ),
  );
}
StateProvider
A state provider is useful when you want to be able to modify the state of that provider. To create a state provider you can write the following:
final nameStateProvider = StateProvider<String>((ref) {
  return "Sparc Agency";
});
With this provider, reading the name is very similar, however, since this is a StateProvider we need to say .state to get the name. (This is still inside the widget build method, I just removed the scaffold to keep the snippet shorter)
Consumer(
  builder: (context, watch, child) {
    final String name = watch(nameStateProvider).state;
    return Text(name);
  },
),
When you want to update the state, you will likely need to access the provider outside of the build method. To do this you can use context.read(). Take a look at this function below, this will change the state of the provider when called and update all the widgets that consume it. I created this function in the onPressed() of a FloatingActionButton:
onPressed: () {
  context.read(nameStateProvider).state = "Anthony Sette";
},
StateNotifierProvider
With a StateNotofierProvider, you will need to create a class that extends StateNotifier. For the sake of simplicity, I will write an elementary class for changing the name like in the previous examples, however, this Provider is very powerful and can be used in very complex situations. Here is the class:
class NameNotifier extends StateNotifier<String> {
  NameNotifier() : super("Sparc Agency");  void setName(String name) {
    state = name;
  }
}
In a StateNotifier the State is immutable, so when modifying the state it needs to be done in an immutable manner. For the example above nothing changes, however, if your StateNotifier modifies a List or other types of data you will need to modify the data without completely reassigning it. Now let's create the StateNotifier Provider based on the class above.
final nameNotifierProvider = StateNotifierProvider<NameNotifier>((ref) {
  return NameNotifier();
});
Now to consume this data in the build method it is very similar to StateProvider, however, the .state resides inside the watch since we are listening to the state.
Consumer(
  builder: (context, watch, child) {
    final String name = watch(nameNotifierProvider.state);
    return Text(name);
  },
),
To update the state we can call the functions created inside our StateNotifier class, and this will update all the widgets that consume it. Again this was placed inside the onPressed() of our FloatingActionButton.
onPressed: () {
  context.read(nameNotifierProvider).setName("Anthony Sette");
},
ChangeNotifierProvider
Similar to the StateNotifierProvider, we need to create a class that extends ChangeNotifier. The main difference between the StateNotifier and ChangeNotifier is that in the ChangNotifier class we can choose when to notifyListeners() of any changes.
This is particularly useful when you have a state that only needs to rebuild when particular values change and not when other changes occur. Check out this example:
import 'package:flutter/material.dart';class NameChangeNotifier extends ChangeNotifier {
  NameChangeNotifier(this._name);
  String _name;String get name => _name;void setName(String name) {
    this._name = name;
    notifyListeners();
  }
}
As you can see in this example, when setName is called the listeners are notified. However, we could create more functions that modify the state without notifying the listeners. Now that we have created this class let's take a look at the provider declaration.
final nameChangeNotifierProvider =
    ChangeNotifierProvider<NameChangeNotifier>((ref) {
  return NameChangeNotifier("Sparc Agency");
});
Now similar to other providers we can consume the data like so, where the NameChangeNotifier is watched, and when we want the name we can call the getter of that class.
Consumer(
    builder: (context, watch, child) {
      final nameChangeNotifier = watch(nameChangeNotifierProvider);
      return Text(nameChangeNotifier.name);
    },
  ),
),
Now to get the provider in a function we can again call context.read() and utilize the setName() we wrote for the NameChangeNotifier.
onPressed: () {
  context.read(nameChangeNotifierProvider).setName("Anthony Sette");
},
As you can see since that function notifies the listeners the UI is updated.
StreamProvider
Perhaps one of the most useful providers, up next we have the StreamProvider. Streams are incredibly powerful and are often used with Firebase to handle listening to changes in the database or user authentication changes. To create a streamProvider we can do the following:
final streamProvider = StreamProvider<int>((ref) {
  return Stream.periodic(Duration(seconds: 1), (x) => x);
});
For those who don’t know Stream.periodic() will emit values to a stream every period which in our example is once per second. So knowing this we can expect every second a new item will be emitted to the stream.
Now to consume the stream, this is vastly different than the examples above. Inside the consumer, we will get our provider which will in this case be of the type AsyncValue<int> . This is part of what makes Riverpod so powerful, we can simply return the value.when() which provides the ability to create a different widget for when the data is there, is loading, and if an error had occurred. Take a look!
Consumer(
  builder: (context, watch, child) {
    final streamNumber = watch(streamProvider);
    return streamNumber.when(
      data: (data) => Text(data.toString()),
      loading: () => CircularProgressIndicator(),
      error: (_, __) => Text("An error occured"),
    );
  },
),
In this example, you can see we built a different widget for each outcome preventing our application from throwing unnecessary errors.
FutureProvider
This is the same as a StreamProvider but with Futures instead of Streams. So I will just show the declaration and use it with minimal explanation.
final futureProvider = FutureProvider<String>((ref) {
  return Future.delayed(Duration(seconds: 2), () => "Sparc Agency");
});
Future.delayed() creates a future and assigns it a value after 2 seconds to showcase the loading widget.
Consumer(
  builder: (context, watch, child) {
    final futureName = watch(futureProvider);
    return futureName.when(
      data: (data) => Text(data.toString()),
      loading: () => CircularProgressIndicator(),
      error: (_, __) => Text("An error occured"),
    );
  },
),
There are additional features to FutureProviders and StreamProviders such as .autoDispose and .family but I won't be talking about them today. Check out the documentation at riverpod.dev for more information.
ScopedProvider
This is one of the least frequently used in my opinion, and so since this article is getting long I will only be explaining what it does and a potential use case. Perhaps I will come back and make an edit to this at a later date.
This Provider is similar to those of the original Provider package, but with the syntax of Riverpod. The ScopedProvider is an inherited widget where only the widgets below that ScopedProvider in the widget tree can access that state. Sound familiar? It should if you have used Provider in the past. Likely, you won't use this often if at all.
More Riverpod
Here are a few important features that I promised to mention. They are all very powerful, and I use them in every application I build.
Another Consumer
As I said previously there are two ways to read a provider inside the build method.
The first has been showcased in all of the examples above. The Consumer() is created so that only the widgets inside of said Consumer are rebuilt when the provider(s) it is listening to changes. This helps to improve the efficiency of your application since it will prevent the entire page from rebuilding if only one tiny part of your application needs to be rebuilt when a change occurs. Here is an example of that again (Taken from the first example of the standard Provider):
Consumer(
  builder: (context, watch, child) {
    final String name = watch(nameProvider);
    return Text(name);
  },
),
The second is to convert your StatelessWidget to a ConsumerWidget. Simply replace the extends StatelessWidget { with extends ConsumerWidget { . In doing this the build method of the widget is overwritten and it becomes a consumer. This is great when the entire StatelessWidget needs to consume data since it will prevent you from using multiple Consumers throughout that Widget. Here is the most simple example, and does the same thing as the snippet above.
class MyHomePage extends ConsumerWidget {
  MyHomePage({Key key}) : super(key: key);@override
  Widget build(BuildContext context, ScopedReader watch) {
    final String name = watch(nameProvider);
    return Scaffold(
      body: Center(
        child: Text(name),
      ),
    );
  }
}
Reading a Provider from another Provider
This is incredibly useful. For example, let's say I want to provide information from my database but it depends on the user’s id. What would I do? One option is nesting consumers, however, there is a better way.
Did you notice the variable ref available in every provider we created? That is the Provider Reference which allows us to call ProviderReference.watch() and access any provider in our app. Check out this example:
final authStateChangesProvider = StreamProvider<User>(
    (ref) => ref.watch(firebaseAuthProvider).authStateChanges());
This provider gets a stream of the user. A stream that either contains the user or null if the user is not authenticated. From my databaseProvider I can access the user to make it easier to get my user’s data.
final databaseProvider = Provider<DatabaseService>((ref) {
  final user = ref.watch(authStateChangesProvider);  if (user.data?.value != null) {
    return DatabaseService(user: user.data?.value);
  }
  return null;
});
I first get the user's data, and if that value is not null I then create a DatabaseService that has my user. This means whenever I want to stream data from my database I won’t need to get my user’s id to find their collection since when I read or watch my databaseProvider the user is already provided.
Conclusion
Congrats, those are the basics for state management with Riverpod. Huge shoutout to Remi and the rest of the developers who created this package from the weak points of Provider. Riverpod is immensely powerful and very easy to use. I am excited to see how this package will grow. There are plenty more advanced topics with Riverpod including Flutter Hooks w/ RiverPod, Firebase w/ Riverpod, etc. If you want to see any of this let me know! This article took a while to create so if it's helpful give it a clap so more of the community can see it! Also, be sure to check out Riverpod.dev, some of the images in this article are taken from their website and of course, all of the information is about their package which has great documentation.